I recently received a request to make a felt flower bridal bouquet using brooches that the bride can later gift to her wedding party. I thought it was a brilliant idea, but found it a tad bit difficult in execution. My first "mock-up" now completed, I decided to use this blog as a venue to show the bride-to-be what I've come up with, rather than sending massive photos through email.
The turquoise flower is the one she referenced when she made the request so I used it to influence others. I only made six into brooches, the rest being filler flowers. The beaded flower in this pic is a brooch, as is, of course, the turquoise.
I found a number of felt bouquets online--who knew it would turn out to be a growing trend!--and was influenced by some of those as well. (The pompom flower is a brooch as well as the one with the pink middle layer in the forefront.)
In this photo, the flower with the stacked buttons, the leaves and the lily with the turquoise center are all filler.
I used felt hydrangeas as a collar. In the finished bouquet, the stems will be wrapped to make it more comfortable to carry, the stems, of course, being wire.
In this photo, the flower with the turquoise center and stacked buttons is a brooch, but I think it needs a third, smaller circle on top, which means I'll have to take it apart. :^P
The embroidered flower with the brooch center is also, itself, a brooch. And that makes six!
I'm such a newbie at this I'd love input, especially from you, Melissa. Have a good day, y'all!
P.S. I redid the flower I mentioned above. I think it works much better now.
I've shared this post at Someday Craft's Whatever Goes Wednesday and Beyond The Picket Fence's Under $100 Linky Party.. Check out the other cool links!
Sunday, May 20, 2012
Friday, May 4, 2012
Of Shoes--and Ships--and Dear Friends
Twenty-five years ago, I was a newly-published author. Though my publishing career didn't last much longer--a mere three books-worth--it left me with something I value much more than money: a dear, dear friend. That year, I judged her manuscript in a national contest and, admiring her skill, attached some notes about what I felt would strengthen her book. (I blush now, looking back, at how inflated my ego was on the sale of one book to think I knew so much about what publishers wanted in a ms.) Kathy, as proper as I came to know her to be, wrote a lovely thank you note. Silly me, I thought she wanted to be my friend so I replied and we began a correspondence, which we've continued in one form or another ever since. We didn't meet face to face for another fifteen years--she lived near Seattle, and at the time I lived near Dallas. Now we have a standing ritual of speaking together every Sunday. Not much ever gets in the way of my conversations with Kathy.
Next week, she'll be eighty, and she wears her age with the grace of the lady she is. I only hope I can wear it as well myself when I reach that age
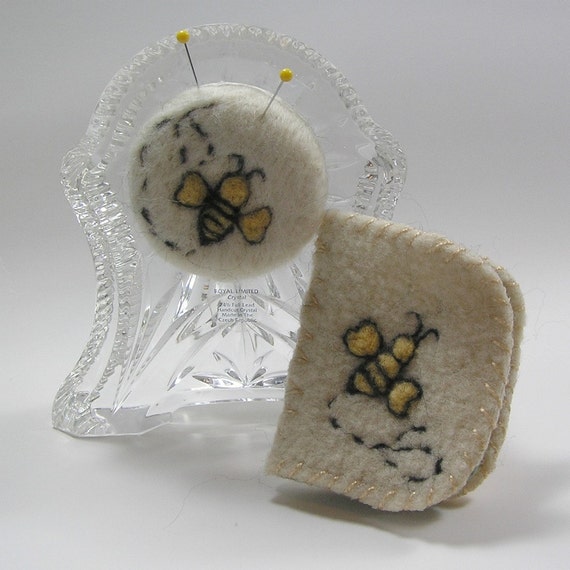
Kathy and I rarely exchange gifts anymore. Occasionally she'll send me something she's made, usually the result of something new she's trying, and occasionally I do the same for her. This year, it's a product of needle-felting, her having introduced me to the technique. In respect of her talents as a couture-level seamstress, this is my offering this year: a make-do pincushion, from a crystal clock minus its workings, and a needle book.
And a card made from an image I found on (as in stole from) the 'net. (We're both cat lovers.)

So when we speak of shoes and ships and sealing wax, of cabbages and kings, don't ever let's forget dear, dear friends.
Next week, she'll be eighty, and she wears her age with the grace of the lady she is. I only hope I can wear it as well myself when I reach that age
Kathy and I rarely exchange gifts anymore. Occasionally she'll send me something she's made, usually the result of something new she's trying, and occasionally I do the same for her. This year, it's a product of needle-felting, her having introduced me to the technique. In respect of her talents as a couture-level seamstress, this is my offering this year: a make-do pincushion, from a crystal clock minus its workings, and a needle book.
And a card made from an image I found on (as in stole from) the 'net. (We're both cat lovers.)

So when we speak of shoes and ships and sealing wax, of cabbages and kings, don't ever let's forget dear, dear friends.
Monday, April 16, 2012
Another Pinspired Recipe
I love finding good recipes on the 'net. This is one I pinned a couple of weeks ago and tried last weekend. It was yummy!
From Mrs. Happy Homemaker, the recipe calls for tilapia, but I, of course, had to change it. I'd rather have salmon any day, and, as I had a hunk of wild-caught sockeye salmon on hand, I panfried some cod for the hub--he's not fond of salmon--and fixed this recipe for me. Oh, happy days!
(As a matter of record, this isn't a picture of my completed dish. I rarely have a camera in the kitchen so I have to depend on others. This is from Mrs. HH's blog post.)
The recipe calls for mayonnaise, and I'm not much of a mayo fan, but OMG! Even before cooking it, it was wonderful. I don't know if it was the lemon zest, or the juice, or just the spices (dill, garlic and onion powders), but I certainly didn't mind the mayo in this dish.
The link above will take you to Mrs. HH's recipe. Try it; you'll like it.
Monday, April 9, 2012
Hanger Slipcovers
Pinterest has become my new obsession. Rather than paying attention to my fave blogs--sorry, guys!--I visit Pinterest more and more often during my time on the computer. I've pinned many items and tried a few. Some were great; some not so much.
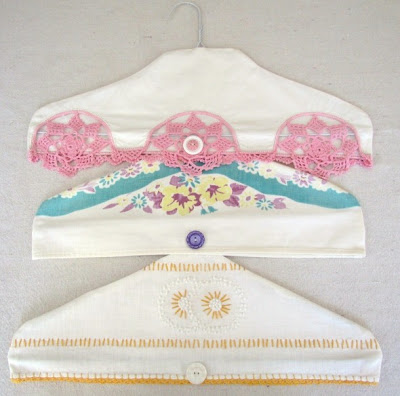
Today I want to talk about these cool hanger slipcovers I found on Salvaged Treasures. She made these out of vintage embroidered pillowcases and, as I had just passed up a number of said items at the thrift store because they were "one-offs", I quickly returned to the store and bought all they had left.
I decided to go a few steps farther than did the original poster (OP) by first padding...
and then covering the hangers.
I used remnants of batting and muslin for these steps so it cost nothing and I believe gives more function to the end product.
Here are the completed hangers:
This one had only a turned up hem, which I didn't feel was decorative enough so I cut it off and added a purchased lace.
Because I believe items such as these should be treasured, I want my construction to equal the work in the original pillowcases so, rather than use adhesive velcro as did the OP, I'll use hand-stitched snaps.
From now on, whenever I hit the thrifts, I'll be on the lookout for decorative pillowcases. What about you? Think you might try this?
I've linked this post to Chic on a Shoestring Decorating's Flaunt it Friday. Stop over and check out the other lovely links!
Today I want to talk about these cool hanger slipcovers I found on Salvaged Treasures. She made these out of vintage embroidered pillowcases and, as I had just passed up a number of said items at the thrift store because they were "one-offs", I quickly returned to the store and bought all they had left.
I decided to go a few steps farther than did the original poster (OP) by first padding...
and then covering the hangers.
I used remnants of batting and muslin for these steps so it cost nothing and I believe gives more function to the end product.
Here are the completed hangers:
This one had only a turned up hem, which I didn't feel was decorative enough so I cut it off and added a purchased lace.
This pillowcase was perfect in size and required little handwork. As I like it! (The blue is much more colorful than my pic shows.)
This case was a tad bit too small--the bottom should flare out more--but I used it anyway. And since it had no decoration save the crochet at the bottom, I added a ribbon rose made from vintage hem tape.Because I believe items such as these should be treasured, I want my construction to equal the work in the original pillowcases so, rather than use adhesive velcro as did the OP, I'll use hand-stitched snaps.
From now on, whenever I hit the thrifts, I'll be on the lookout for decorative pillowcases. What about you? Think you might try this?
I've linked this post to Chic on a Shoestring Decorating's Flaunt it Friday. Stop over and check out the other lovely links!
Sunday, April 8, 2012
Pinterest Pass or Fail--French Onion Salisbury Steak and a few other recipes
I'm open to trying pretty much anything when it comes to recipes. Some I make for myself; others, if I think the hub will eat them, I make for us both. (He is a picky eater.)
I've tried a few lately I'd like to share, beginning with the French Onion Salisbury Steak at Will Cook for Smiles.
I'm not much of a beef eater, though, of course, the hub is. When I saw this recipe, I thought it might be something even I would like. And, honest, when I tasted it, I actually went "mmm!" I seldom do that with anything I make at home, never with beef!
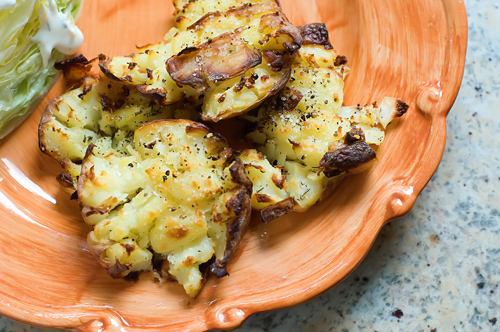
With it, I served Pioneer Woman's Crash Hot Potatoes. It's an excellent recipe, as hers generally are, and one I've made several times. One thing I've learned is to leave it in the oven longer than the recipe calls for. The longer you leave it, the crispier it gets, and who doesn't love crispy?
This last recipe I made for myself only--hub's not a veggie fan. I wasn't as pleased with Everything Fab's Mozzarella, Tomato, and Avocado Salad as I thought I'd be, though I'm not sure why. I'll definitely try it again, but next time I'll use a balsamic reduction rather than the lemon juice called for. I like the heartiness of balsamic, and this combination of veggies should carry it off.
So--pass or fail? A hearty pass on the first two, a milder one on the third.
Oh, and btw, Happy Easter, y'all!
Thursday, March 22, 2012
Pinterest Challenge--Marbled Paper
I'm loving Pinterest--as who isn't. I found this post for making marbled paper with shave cream and watercolors at Bliss Bloom Blog and was determined to try it. I'd seen a similar technique on an old Creative Juice tv show with Cathie Filian and Steve Piacenza using tempera paints, but I liked the soft look of the watercolors.
I started with the cheapest shave cream I could find, maybe a buck at a dollar store. I had the watercolors in a little kit I bought a few years back, and I'll admit I didn't follow the directions exactly as given on the original post. I always just read through the post, then go out to my studio with a general idea of how to do it. So-o-o, my results are far from as lovely as the above image, but I'm liking it anyway. Here's what I began with:
On Bliss Bloom, she used a fork to marble with and a ruler to scrape off the shave cream. For the first sheet I made, I combed straight through with a hair comb--it's all I had in my studio. Also for the first one, I used the colors as they came from the tube: Prussian Blue, Scarlet, Yellow, and Emerald.
To scrape, I used a putty knife. I think the ruler would have worked better, but by the time I'd made it to my studio, which is like 50' from the house, I'd already forgotten what she used. I swear it's not poor memory; it's just not paying attention.
For the second sheet, I lightened the original colors with white and combed with a swirl motion, again using the putty knife for removal.
And for the last, I simply added a few spots to what was left of the paints in the shaving cream, using the last of what I'd mixed up, and combed the swirls in a different direction. I think this is my fave piece.
I'll definitely try this technique again, hopefully getting more adept each time. But next time I'll do it at the kitchen sink. I have no running water in my studio and I had paint and shave cream everywhere.
Now I'll use one of these as end papers on a book box as demonstrated by Gail at Can't Stop Making Things.
Isn't it lovely? I made a couple of these as gifts for my sis and SIL and failed to take pics. As I so often do. But I intend to make another in the next few days, again as a gift. This one I'll chronicle in pictures; I promise. Come see me soon for a view of how my papers look in a book box.
I started with the cheapest shave cream I could find, maybe a buck at a dollar store. I had the watercolors in a little kit I bought a few years back, and I'll admit I didn't follow the directions exactly as given on the original post. I always just read through the post, then go out to my studio with a general idea of how to do it. So-o-o, my results are far from as lovely as the above image, but I'm liking it anyway. Here's what I began with:
On Bliss Bloom, she used a fork to marble with and a ruler to scrape off the shave cream. For the first sheet I made, I combed straight through with a hair comb--it's all I had in my studio. Also for the first one, I used the colors as they came from the tube: Prussian Blue, Scarlet, Yellow, and Emerald.
For the second sheet, I lightened the original colors with white and combed with a swirl motion, again using the putty knife for removal.
I'll definitely try this technique again, hopefully getting more adept each time. But next time I'll do it at the kitchen sink. I have no running water in my studio and I had paint and shave cream everywhere.
Now I'll use one of these as end papers on a book box as demonstrated by Gail at Can't Stop Making Things.
Isn't it lovely? I made a couple of these as gifts for my sis and SIL and failed to take pics. As I so often do. But I intend to make another in the next few days, again as a gift. This one I'll chronicle in pictures; I promise. Come see me soon for a view of how my papers look in a book box.
Monday, March 12, 2012
Make-dos
I've become fascinated by the principle of "make-dos." According to Old World Primitives, "A make-do is created using items that are immediately available, historically out of necessity. Make-dos can either be antique or new (often made to look old by primitive folk artists). They incorporate items that broke and were repaired using whatever was on hand, or broken parts that were used in creating something new. The most common make-dos are handmade pincushions added to the top of the salvaged bases of broken candlestick holders, oil lamps, or teapots. Pincushion make-dos created by women who made do with what they had were prevalent during the 18th & 19th centuries."
Perhaps my fascination comes from the fact that my family were poor as I was growing up. We left poverty behind a long time ago, but the principles have stayed with me. I can spend a couple of hundred dollars on a handbag, and have done, but I'd much rather find a Dooney in a thrift store, which I've also done, than buy a brand-new one from an up-scale department store.
So when I'm at thrift stores, I always always look for things I can turn into other things. Luckily, I'm never disappointed. I've added designs to discarded pillows and made pincushions from miscellanea. Today, I want to talk about the pincushions.
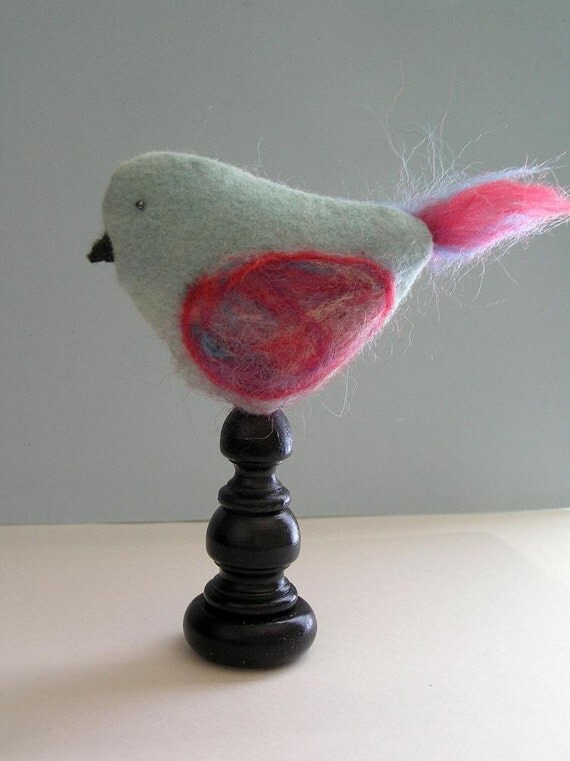
This first one, which I sold a couple of years ago, isn't truly a make-do. The bird was made from purchased felt and the base from wooden parts I bought at a craft store. Still, he looks as if he might have been a make-do, doesn't he?
The next one I made from a crystal clock I found that was missing its innards.I think I paid less than a dollar for it.
I also think it turned out well. The pincushion was both needle-felted and wet-felted, the design needle-felted, as was the design on the needle book, which was made from a fulled wool blanket. You can find the set for sale here.
The last one I'm showing today I made using a crystal and silver coaster I picked up the same day as the clock, probably for about the same price. Once part of a set, it was all by its lonesome when I found it. I knew at once it'd make a great pincushion.
For it, I used another piece of that old hand-stitched quilt I spoke of last post. Trying to save the largest portions for another use, I was forced to use a piece that had a big white block at the center with only some of the colorful blocks around the edge. So I embroidered a few bullion roses on the white.
The needle book I made from a teensy scrap of the quilt onto which I sewed a doily I began and never finished many years ago. I really hate to discard anything!
What about you? Do you fancy remaking things? I'd love to hear your comments!
Subscribe to:
Posts (Atom)


