For the past year, I've been working on a couple of brooch bridal bouquets for my Etsy shop. Actually, at the start I intended to do a single mixed metal bouquet, but that didn't float my boat so I separated it into two. That meant I had to search longer for pieces than I thought I would, but who doesn't love searching?
Here's the gold one as I was working on it. (I removed all the masking tape before I finished, but it's a handy way to hold things for a while.)
Here it is completed. Do you love it or am I just blinded by my own shining self?
I even added a decoration to the bottom of the handle.
Cool, innit?
To make the bouquet, I followed a number of tutorials I found on the 'net but they only took me so far. From there, I improvised. I'm quite pleased with how it turned out, but think I'll take a break before working on the silver. (Finding silver tone pieces has been much more difficult than finding gold tone, perhaps because with the silver I want rhinestones. As a result, I've got a lot more money invested in the silver than in the gold.)
This is me, dusting my hands in satisfaction!
Saturday, February 23, 2013
Friday, February 22, 2013
Tassels Heard from Again
It's been awhile since I worked on tassels, but I recently had a request for a couple. I thought I'd use this blog to present ones I've already done. So here goes....
This is more formal, sort of elegant. I used bits of sample fringes to make it, bits I no longer have. It's not in the colorway the client wants, nor are any of the others I show here, but hopefully they'll give an indication of what I can do.
Only in the past few years have I been adding ruffs to tassels. I like the look of them, but they detract from the heads, which I consider the most creative part.
On this one, the ruff I added was more sparse so it doesn't completely obscure the head.
I like the ribbon yarn I used on this one, not that crazy about the ruff. If I try that technique again, I'll have to tweak it. (The yarn's in shades of blue and green. In this one, I emphasized the green more than the blue.)
This is probably my fave yarn. It's strips of silk cut from saris and sewn together. The colors are random but I like how they work together.
The tassel the customer referenced was made before I started adding ruffs. See how much more striking the head is without the ruff?
This is more formal, sort of elegant. I used bits of sample fringes to make it, bits I no longer have. It's not in the colorway the client wants, nor are any of the others I show here, but hopefully they'll give an indication of what I can do.
On this one, the ruff I added was more sparse so it doesn't completely obscure the head.
I like the ribbon yarn I used on this one, not that crazy about the ruff. If I try that technique again, I'll have to tweak it. (The yarn's in shades of blue and green. In this one, I emphasized the green more than the blue.)
This is probably my fave yarn. It's strips of silk cut from saris and sewn together. The colors are random but I like how they work together.
The tassel the customer referenced was made before I started adding ruffs. See how much more striking the head is without the ruff?
Sunday, January 6, 2013
Button Lampshade and Thrift Store Lamps
I finally finished my button lampshade! It was a lot of work, and I can find oh so many things I don't like about it, but it's done. 'Nuff said.
I actually don't have problem with the shade as much as how it suits the lamp that bothers me.
But finishing the shade got me thinking about thrift store lamps. I started thrifting years ago and found the lamp above in the late eighties in a DAV store in Oak Cliff, a Dallas neighborhood, for around $15. (Actually my friend found it and let me buy it. She's got the best eye of anyone I've ever known!) It's getting harder to find lamps of this quality anymore. Not impossible, just harder.
This one came from a junk shop in Mesquite, a Dallas suburb, around the same time. I paid $4 for it, but it had had its electrical bits removed. Isn't she gorgeous? A friend says she looks like Elizabeth Taylor, and maybe she does a bit.
The friend who found that first lamp found this one as well. As I said, she has an eye. Anything Margie finds is either beautiful or worth a lot of money, often both.
This was painted gold when she found it, though I think the original finish might have been bronze-like. I stripped as much of the gold paint as I could, but it'll never be what it once was.
Here's a closer look at the details. Cool, huh?
Several years ago I found a lamp for my sister and posted about it here.
I fell in love with it myself and if I hadn't already promised it to her would have kept it. Wouldn't my button lampshade look terrific on it? Ever since I've wanted one just like it, but they sell for several hundred dollars if you find them on the 'net. So I bought this one for about thirty dollars.
Similar but not the same quality and much larger. Hmm, wonder how my button lampshade would look on it. Maybe I'll try switching things around tomorrow.
I'm sharing this post with Chic on a Shoestring's Flaunt it Friday. Check it out!
I actually don't have problem with the shade as much as how it suits the lamp that bothers me.
The lamp is formal, the shade feminine. Sometimes the difference bothers me, sometimes not not so much.
This one came from a junk shop in Mesquite, a Dallas suburb, around the same time. I paid $4 for it, but it had had its electrical bits removed. Isn't she gorgeous? A friend says she looks like Elizabeth Taylor, and maybe she does a bit.
The friend who found that first lamp found this one as well. As I said, she has an eye. Anything Margie finds is either beautiful or worth a lot of money, often both.
This was painted gold when she found it, though I think the original finish might have been bronze-like. I stripped as much of the gold paint as I could, but it'll never be what it once was.
Here's a closer look at the details. Cool, huh?
Several years ago I found a lamp for my sister and posted about it here.
I fell in love with it myself and if I hadn't already promised it to her would have kept it. Wouldn't my button lampshade look terrific on it? Ever since I've wanted one just like it, but they sell for several hundred dollars if you find them on the 'net. So I bought this one for about thirty dollars.
Similar but not the same quality and much larger. Hmm, wonder how my button lampshade would look on it. Maybe I'll try switching things around tomorrow.
I'm sharing this post with Chic on a Shoestring's Flaunt it Friday. Check it out!
Monday, October 29, 2012
Workin' On the Guest Room
I live my life on lay-away, doin' a little at a time, and that's how I'm re-doing the guest bedroom. I don't have before pictures, one result of doing things so haphazardly, and I'm not finished, which is another result. But here are some pics of where I am at the moment.
I wanted to add hits of white, without painting furniture, which I neither like to do nor do well.
These pics are of the hub's family, previously framed in some wooden frames I didn't want to paint. So I found some cheap ones at Walmart, painted them up with Annie Sloan chalk paint and covered some mats in old wallpaper graphics from Graphics Fairy. (The bear was part of a gift from the hub in the early eighties. His paws are clips and they held a gold chain. I think I like the bear every bit as much as I do the gold chain. The bit of tatting around his neck is something I picked up long ago in a box of old linens.)
I made the bedskirt of medium weight linen from Dharma Trading. Need I say I did it in bits, and it took forever? For quite a while I had only the end and one side finished--and on the bed. I ran out of linen and had to order more, and then couldn't remember what weight I'd used and wound up mis-ordering twice before I finally got the right weight. Which just gives me gobs more linen to use in sewing.
I go the easy route on making bedskirts, constructing them as if they were an actual skirt with fabric gathered onto a "waistband," which is upholstery-pinned to the mattress. Then I can change them out easily without removing the mattress.
Another Graphics Fairy image, Citra-solve transferred to a linen/cotton blend from Dharma Trading (one of the mis-orders). The first time I ever did the Citra-solve method, it smudged a little at the top, but I won't tell if you don't.
This is a vignette I'm not yet happy with yet. (Aside from the fact that it's messy. I read in this room, hence the reading glasses I usually corral in the pottery.) The doll was a gift from my baby sister a few years back, and I'd been displaying itr in a sewing machine drawer I didn't want to paint. So, instead, I painted up an old clementine box, added some corkboard in the back to hide some staining from clementines gone bad, and used the Mod Podge method to transfer another Graphics Fairy image. (Like Graphics Fairy much? Yes, I do!) The books are covered with wallpaper images, also from Graphics Fairy. One of the things I still plan to do is tie them up with twine, instead of the lace, and add a number tag.
I have no good reason to show this side of the bed, except for what I consider my ingenuity. A couple of years ago, I bought a bedside table that was equal to the height of the mattress, which this table is not. The top on the new one was messed up where someone had scratched a name into the finish. I bought it anyway, thinking I could use the furniture/refinisher stuff to even out the finish. Didn't work, so the hub started sanding. The top is now beautifully sanded, but the rest needs to be done--it has two drawers. So the table has been sitting in his workshop ever since. It's too hot to work on it in the summer, which we have a lot of here in Texas, and when it's not summer, we've both forgotten about it. So this was my "temporary" fix. I stacked books up to reach the height of the bed and added a tray across the back to set the lamp on. The table in the shop may or may not ever get finished, but this is working so I'm not complaining.
I'll be sharing this post with The Graphics Fairy Brag Monday. Check it out--there's some really clever people out there in blog-land. Also sharing at Chic on a Shoestring's Flaunt it Friday.

I wanted to add hits of white, without painting furniture, which I neither like to do nor do well.
These pics are of the hub's family, previously framed in some wooden frames I didn't want to paint. So I found some cheap ones at Walmart, painted them up with Annie Sloan chalk paint and covered some mats in old wallpaper graphics from Graphics Fairy. (The bear was part of a gift from the hub in the early eighties. His paws are clips and they held a gold chain. I think I like the bear every bit as much as I do the gold chain. The bit of tatting around his neck is something I picked up long ago in a box of old linens.)
I made the bedskirt of medium weight linen from Dharma Trading. Need I say I did it in bits, and it took forever? For quite a while I had only the end and one side finished--and on the bed. I ran out of linen and had to order more, and then couldn't remember what weight I'd used and wound up mis-ordering twice before I finally got the right weight. Which just gives me gobs more linen to use in sewing.
I go the easy route on making bedskirts, constructing them as if they were an actual skirt with fabric gathered onto a "waistband," which is upholstery-pinned to the mattress. Then I can change them out easily without removing the mattress.
Another Graphics Fairy image, Citra-solve transferred to a linen/cotton blend from Dharma Trading (one of the mis-orders). The first time I ever did the Citra-solve method, it smudged a little at the top, but I won't tell if you don't.
This is a vignette I'm not yet happy with yet. (Aside from the fact that it's messy. I read in this room, hence the reading glasses I usually corral in the pottery.) The doll was a gift from my baby sister a few years back, and I'd been displaying itr in a sewing machine drawer I didn't want to paint. So, instead, I painted up an old clementine box, added some corkboard in the back to hide some staining from clementines gone bad, and used the Mod Podge method to transfer another Graphics Fairy image. (Like Graphics Fairy much? Yes, I do!) The books are covered with wallpaper images, also from Graphics Fairy. One of the things I still plan to do is tie them up with twine, instead of the lace, and add a number tag.
I have no good reason to show this side of the bed, except for what I consider my ingenuity. A couple of years ago, I bought a bedside table that was equal to the height of the mattress, which this table is not. The top on the new one was messed up where someone had scratched a name into the finish. I bought it anyway, thinking I could use the furniture/refinisher stuff to even out the finish. Didn't work, so the hub started sanding. The top is now beautifully sanded, but the rest needs to be done--it has two drawers. So the table has been sitting in his workshop ever since. It's too hot to work on it in the summer, which we have a lot of here in Texas, and when it's not summer, we've both forgotten about it. So this was my "temporary" fix. I stacked books up to reach the height of the bed and added a tray across the back to set the lamp on. The table in the shop may or may not ever get finished, but this is working so I'm not complaining.
I'll be sharing this post with The Graphics Fairy Brag Monday. Check it out--there's some really clever people out there in blog-land. Also sharing at Chic on a Shoestring's Flaunt it Friday.
Friday, July 20, 2012
And Yet More Cards
Last post, I talked of all the celebrations to come this week but only shared one card I made. I thought now I'd show you the others.
For my anniversary card, I was inspired by this framed quote from a little about a LOT
Here's mine:
And yes, I realize I put fried fish twice. When we were young, I pretty much fried fish every Friday, but even so it was a mistake I made transferring the words onto the image. And yes, he noticed. :^P
The card for my used-to-be next door neighbor was inspired by Yuriko Craft 4 You .
Now mine:
I used a note card from Michael's dollar section as the base along with leftover paper bits and some vintage buttons. (About fifteen years ago, Patsy, who was then my neighbor, now in her mid-eighties, gave me a cigar box full of buttons from her grandmother. I don't know that these are from that box--I've picked up many containers of old buttons since then--but vintage buttons always remind me of Patsy, which, I think, makes this card very appropriate.)
And that's all for now. Have a good 'un.
Friday, July 13, 2012
July Celebrations
Lots to celebrate this month! First, my cat's birthday, and, no, I don't know the exact date he was born. We brought him home October 13, 2001, and the vet said he was four months old so we reckoned July.
Isn't he a cutie? Heart of my heart.
My anniversary is the 19th--this will be my 48th. Yeah, I know; that's a long time, and I wouldn't trade one day of it. I'm lucky enough to be married to my best friend.
On the birthday front, a dear friend's is the 14th; that's tomorrow as I'm writing this, and another, a used-to-be neighbor's, is the 20th, and a sister's is the 21st.
That's a lot of card-making, and I only have one finished.
I printed an Audrey Hepburn quote onto light gray cardstock and added buttons and ribbon at the bottom (to hide the fact that I'd printed the quote too high). The envelope is made from a gray and black print scrapbook paper.
So now you know what I'll be doing next week: more cards. (At least, Max doesn't require one.)
Saturday, July 7, 2012
Button Cards
I'm a beginner at card making. My attempts in the past have simply been quotes printed on cardstock. After tooling around the 'net for inspiration, I decided to spread my wings a bit.
For this one, I used a stamp, blocking the flowers on it with masking tape, before I loaded it up, then stitching on vintage buttons as flowers. For the yellow flower, I used green cord, and it was a doozer to get through the card and the buttons. I wound up with less than I needed to tie a double knot so I dabbed a bit of tacky glue over the single knot and covered the glue and knot with a star punched from yellow paper. For the peach button, I used crochet cotton I'd colored with green ink. All the envelopes, I lined with green striped paper.
For this one, I put text above a clip art bicycle and printed it onto white cardstock, which I cut into a tag shape. I stitched buttons over the wheels, tied the tag with ribbon and glued it onto a card covered with green patterned paper.
I used clip art for this one too and did the same printing onto cardstock and cutting into a tag routine. The background on this is strips of printed paper glued onto a piece of cardstock, then attached to a card.
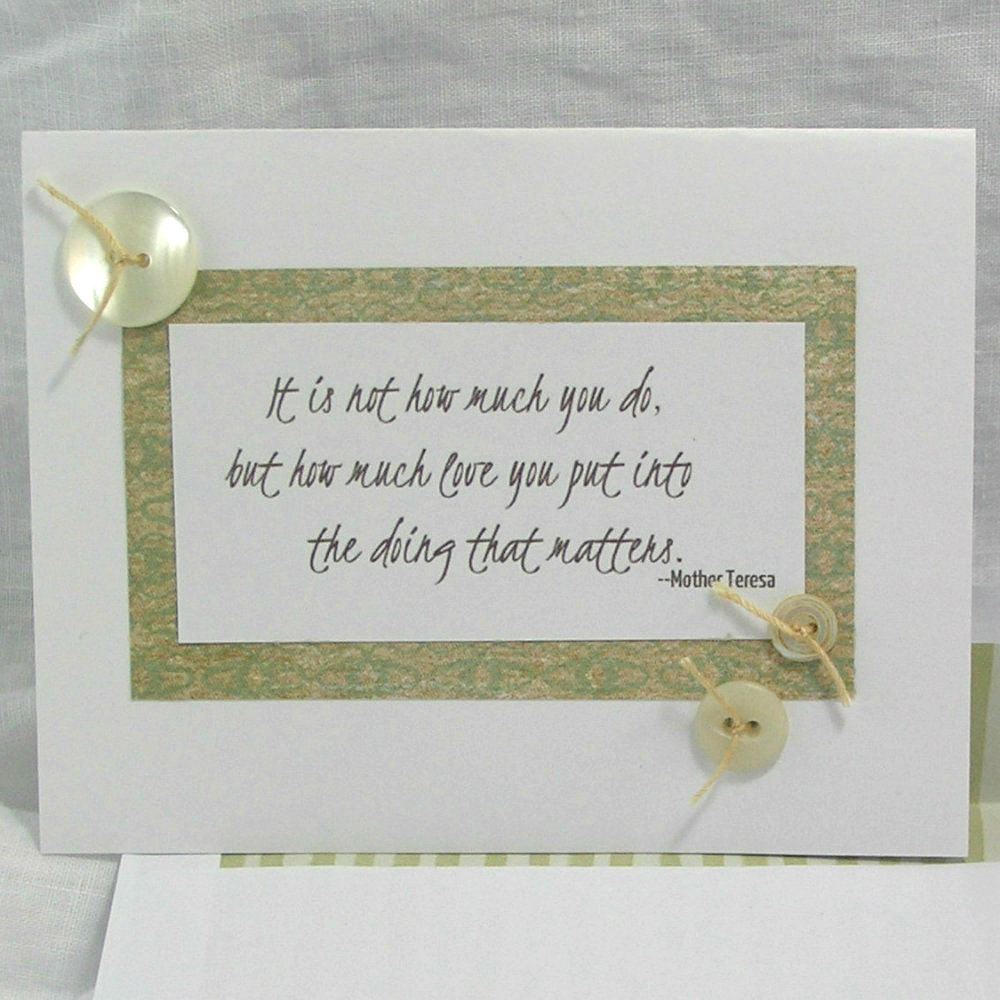
This is similar to my earlier ones in that it's a famous person quote, but different in the extras. (The others had none.) I used printed cardstock as a frame around the quote and embellished with buttons.
This one's simple, but I think it looks elegant. Just a stamp on a piece of white cardstock, backed by a bit of patterned cardstock, beneath strips of three different cardstocks, one patterned, the other two plain. And five vintage buttons stitched on with vintage crochet cotton.
The last is the one I actually began with. I did the banner and intended simply to stamp some kind of something below it, but I'd gotten into a button mood so added them here as well.
And that's about it for cards right now. I have another GG birthday in August I need to prepare for, but I have plenty of time for that. My next project is finishing the bedskirt I'm making for the guest room.
Tomorrow.
Subscribe to:
Posts (Atom)